Configuring Layer Visualizations
The visualizations available in a map layer depend on the layer type.
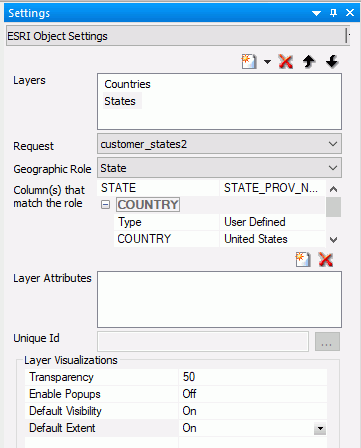
The following image shows the Layer Visualizations section of the ESRI Object Settings panel.
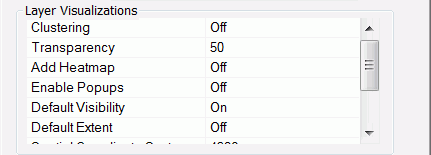
A list of layer visualizations you can configure in the Layer Visualizations section of the ESRI Object Settings dialog box follows.
- Clustering
-
Description. Enables clustering (grouping of symbols) on the selected layer.
Type of Field. Boolean.
Populated by. User.
Limits. On/Off. Default is Off.
Example. On
- Transparency
-
Description. Transparency of the layer.
Type of Field. Numeric.
Populated by. User.
Limits. Values 0 - 100. 100 is 100% opaque, and 0 is 100% transparent. Default is 50.
Example. 50
- Add Heatmap
-
Description. Applies to Point of Interest and Cities geographic roles. Colors the areas around the points using a gradient in which the intensity of the color is based on the concentration of points.
Type of Field. Boolean.
Populated by. User.
Limits. On/Off. Default is Off.
Example. Off
- Enable Popups
-
Description. Shows an InfoWindow with the values of the layer attribute fields when a polygon or point is clicked.
Type of Field. Boolean.
Populated by. User.
Limits. On/Off. Default is Off.
Example. Off
- Default Visibility
-
Description. Makes the layer initially visible or not visible.
Type of Field. Boolean.
Populated by. User.
Limits. On/Off. Default is On.
Example. On
- Default Extent
-
Description. If Default Extent is Off, the map view is the extent of the first layer loaded. If it is On, the map view is the full layer. The map extent is determined as follows:
- If there are no layers, the extent is the entire map.
- If any layer is configured with the default extent, the extent is determined by that layer data.
- If there are one or more layers and no layer is configured with the default extent, the extent is determined by the data for the first layer.
Type of Field. Boolean.
Populated by. User.
Limits. On/Off. Default is Off.
Example. Off
- Spatial Coordinate System
-
Description. Is the id of coordinate system used by the WebFOCUS procedure to provide geographic data. For information about coordinate systems available with Esri, see https://developers.arcgis.com/javascript/jshelp/ref_coordsystems.html.
Note: For any Spatial Coordinate System under Layer Settings other than 4326, please use an internally hosted Geometry Service. This will require projection on the fly. For more details about Geometry Service please see http://server.arcgis.com/en/server/latest/publish-services/linux/about-the-geometry-service.htm.
Type of Field. ID.
Populated by. User.
Limits. Default option is decimal degrees (id=4326).
Example. 4326
Example: Enabling Clustering
If you turn on Clustering in the Layer Visualizations section of the ESRI Object Settings panel, groups of markers will be combined into one cluster icon, with the number of individual markers included shown on the icon. The markers are categorized into ranges, and the cluster markers are colored according to the range of markers they represent.
Using the customer_locations procedure described in Configuring a Map Data Layer, run the HTML page. The output is shown in the following image:
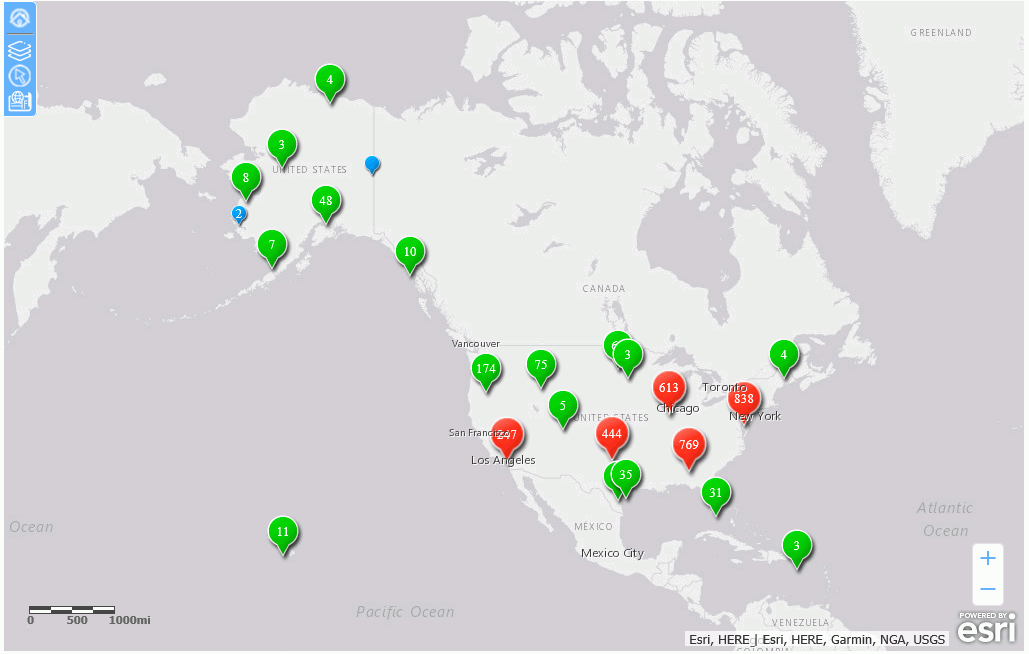
The clusters change as you zoom the map.
Example: Enabling Popups
When you enable popups in the Layer Visualizations section of the ESRI Object Settings panel, and you click a marker or polygon, an InfoWindow opens that shows additional information for the map layer drawn. This popup is dependent on the layer attributes enabled at design time.
The following image shows an InfoWindow for a marker on the map layer:
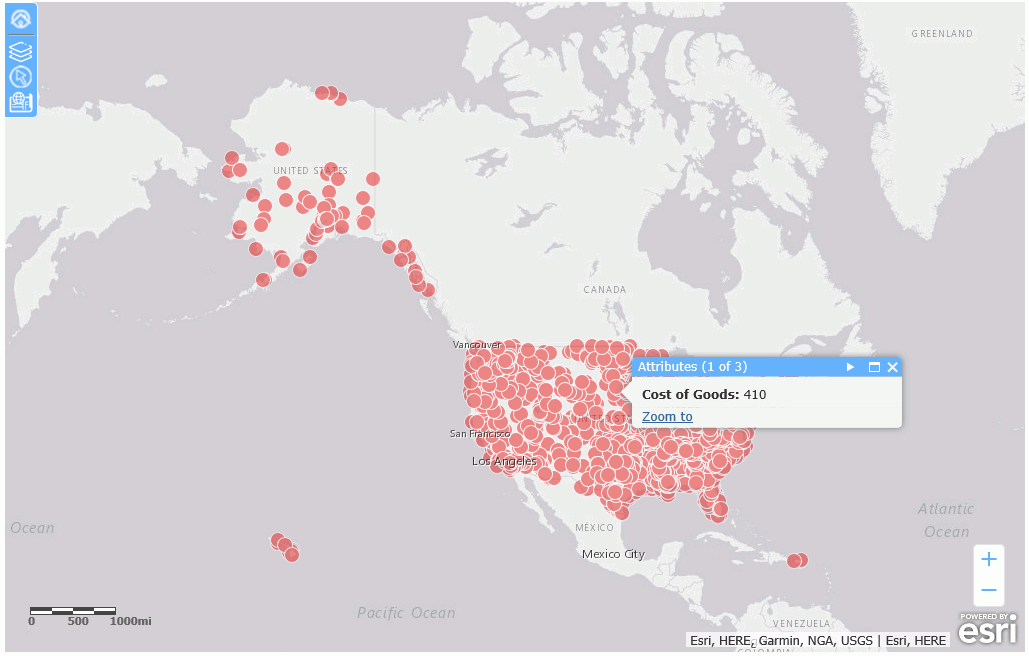
Note: In order to display customized names rather than field names in the popup, the custom names must be defined with the TITLE attribute in the Master File. Using an AS name in the request to create a custom name is not supported in the infowindow.
To close the InfoWindow, click the X in the header or click another marker.
Clicking Zoom to zooms in the map to the location of the clicked marker.
Example: Enabling the Default Extent
With the Default Extent visualization Off (the default), the initial view of the layer shows the map view of the data layer defined. If there are multiple data layers, only one layer can have the Default Extent turned on. In this case, the map view will be determined by the map layer that has the Default Extent turned on. If no layer has Default Extent turned on, the extent of the first data layer defined for the map will be used.
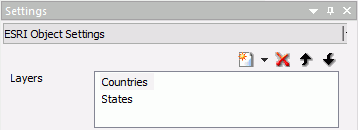
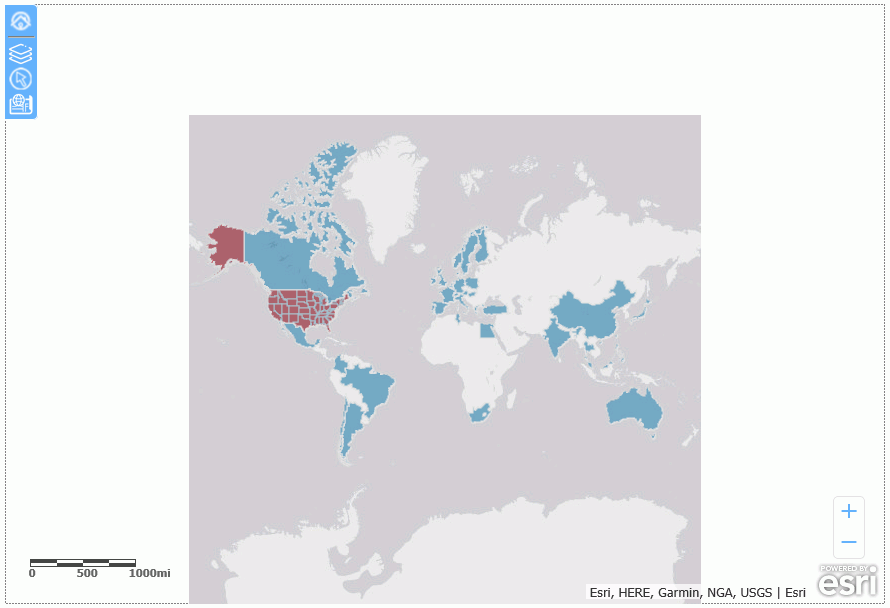
The following image shows a map that has two layers, one based on countries, and one based on US states, as shown in the following image.
Running the HTML page shows both layers, with the default extent set by the Countries layer, as shown in the following image.
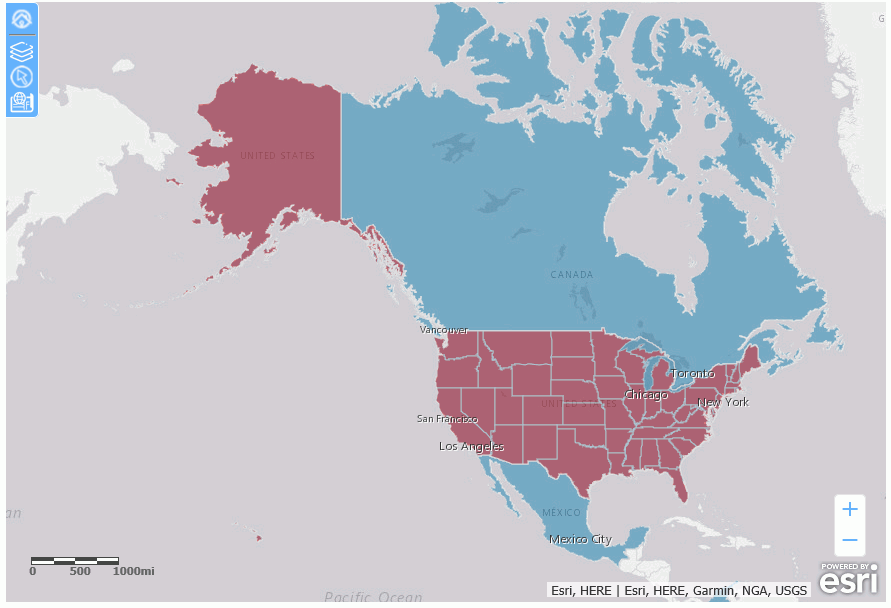
The following image shows the States map layer with the Default Extent turned on.
The following image shows that the map now zooms to the default extent of the States map layer.
If you have zoomed the map using the zoom controls, you can return to the default extent using the Default Extent control, shown in the following image.

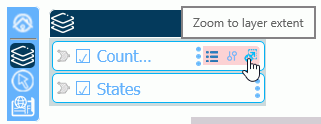
For any layer, you can zoom to the layer extent using the Table of Contents control, shown in the following image.
| WebFOCUS | |
|
Feedback |