Granting Access to Domain-Based Magnify Search Results
|
Topics: |
By default, access to Magnify Search results does not conform to the domain-based WebFOCUS Security Model. Searches return results across all indexes, as opposed to indexes created for individual user-accessible domains.
Administrators can choose to configure access to Magnify Search content to conform to the domain-based WebFOCUS Security Model and ensure that searches return results only from those domains that are accessible to the user initiating a search. For example, an individual who is a member of the basic user group of the Sales and Marketing domains can only search indexes within those domains. By contrast, an individual in the administrator group has access to all domains, and can search indexes in any of them.
If you enable Magnify Search domain-level security, the List and Run role must be granted to all of the domains and their groups that will be included in Magnify Searches. This role consists of the Access Resource privilege, which allows users to view resources, such as reports, charts, and other content in a list of available resources, and the Run Resources privilege, which allows users to run resources such as reports, graphs, pages, and schedules, and to access static content.
Establishing an Index for a Domain
|
How to: |
The use of domain-based security for Magnify Search ensures that only those users who have the privilege to review or work with the content within a specific domain can see search results taken from the index to the content of that domain when they use Magnify Search.
In order to assign an index to a domain, you must link it to the domain to which it applies by using the same value for the Name assigned to the domain and the name assigned to the index itself. Domains maintain a Title, which is visible to users on the Home Page and elsewhere within the application, and a Name based on that title, which, typically, is not visible to users. The Name is used internally to identify the domain within the IBFS (Information Builders File System).
When you create the index for the domain, use the value assigned to the domain Name field as the name of the index. By assigning the same value to name the domain and index, you clearly identify the link between the index and the content it targets. Users who are assigned to the domain will be able to see a recognizable name for the related index in the list of available indexes on the Magnify Search Page.
If users assigned to that domain require the use of additional domain based indexes to support their research, you can assign other domain indexes to a collection of indexes made available to users of that domain.
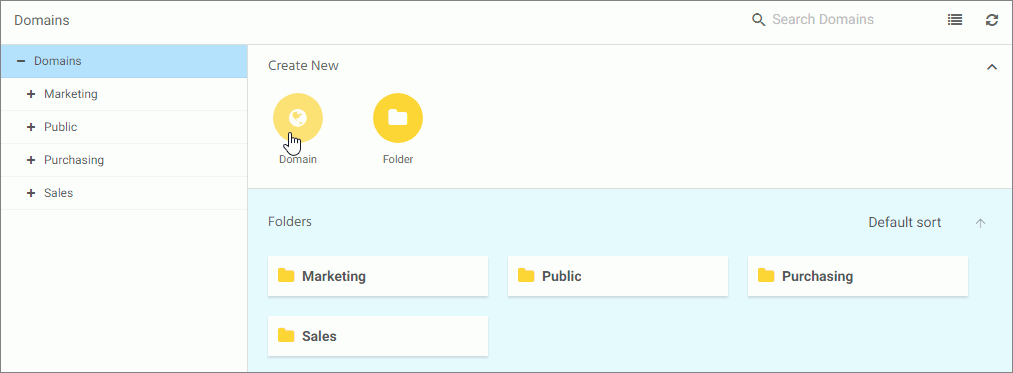
Procedure: How to Create a Domain That Supports a Magnify Index From the WebFOCUS Home Page
- Sign in to WebFOCUS as an administrator.
- On the WebFOCUS Home Page, in the WebFOCUS Explorer Resources tree, click Domains if it is not highlighted already
or
In the breadcrumb trail, click Domains.
- On the actions bar, under Create New, click Domain, as shown in the following image.
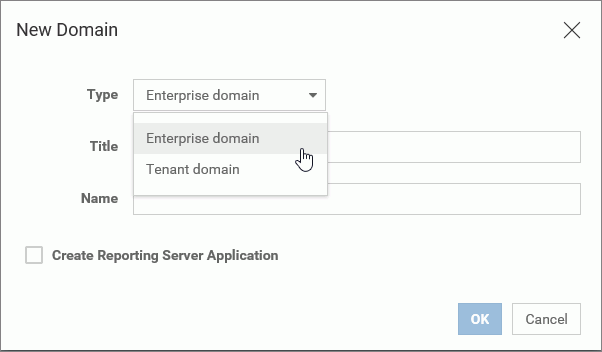
- In the New Domain dialog box Type list, select one of the following domain types, as shown in the following image:
- Click Enterprise Domain to create a department or division domain for an enterprise.
- Click Tenant Domain to create a tenant domain for a SaaS provider.
- In the Title field, type a description of the domain, as shown in the following image.
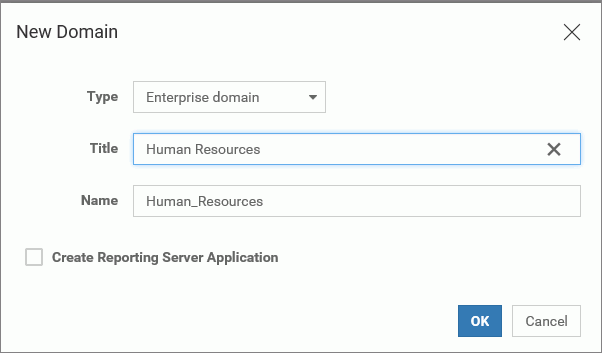
As you type, WebFOCUS automatically assigns the description you type in the Title field, adjusted to conform to IBFS rules, to the Name field.
- Type over the automatically-assigned value in the Name field with a short, single word term that identifies the index (collection)
for this domain.
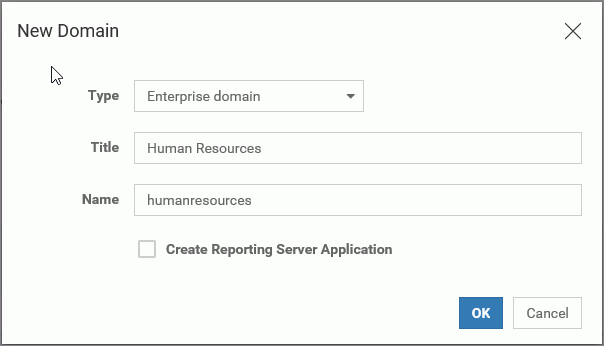
Note: Because Magnify Search and the repository are case-sensitive, use lowercase characters for the value you assign to the Name field. For example, replace a term like Human_Resources with humanresources, as shown in the following image.
- To create an associated application directory on the Reporting Server, select the Create Reporting Server Application check box.
Note: If you include the Create Reporting Server Application option, you need to create and implement an authorization strategy that grants domain users appropriate access to application directories on the Reporting Server. For more information, see Understanding Access Control Templates in the WebFOCUS Security and Administration technical content.
As you select or clear this check box, WebFOCUS dynamically updates the value in the Name field to remove characters that are not allowed for resource names.
- When your selections are complete, click OK.
Procedure: How to Create a Domain That Supports a Magnify Index From the Legacy Home Page
- Sign in to WebFOCUS as an administrator, and open the Legacy home page.
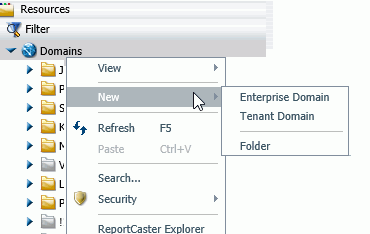
- Right-click the Domains node in the Resources tree and point to New, as shown in the following image.
- Click Enterprise Domain to create a department or division domain for an enterprise.
- Click Tenant Domain to create a tenant domain for a SaaS provider.
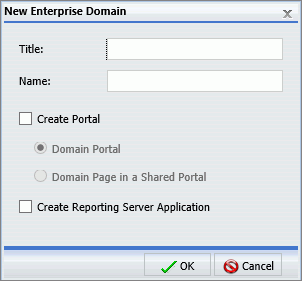
If you clicked Enterprise Domain, the New Enterprise Domain dialog box opens, as shown in the following image. If you clicked Tenant Domain, the New Tenant Domain dialog box opens. Both dialog boxes include the same set of features and layout.
Note: When the Basic Portal check box, located on the BI Portal page of the Administration Console, is cleared, the Create Portal check box in the New Enterprise Domain and New Tenant Domain dialog boxes is also cleared, as shown in the following image. This check box, and the options associated with it, are unavailable, and you will be unable to create a domain that includes a portal or a domain page in a shared portal.
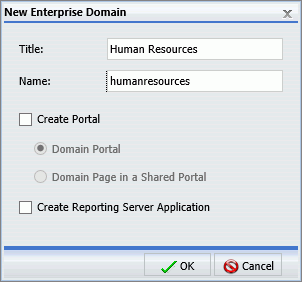
- In the Title field, type a description of the domain.
As you type, WebFOCUS automatically assigns the description you type in the Title field, adjusted to conform to IBFS rules, to the Name field.
- Type over the automatically-assigned value in the Name field with a short, single word term that identifies the index (collection)
for this domain.
Note: Because Magnify Search and the repository are case-sensitive, use lowercase characters for the value you assign to the Name field. For example, replace a term such as Human_Resources with humanresources, as shown in the following image.
- To create optional resources along with the domain, perform the following:
- To create a Portal, select the Create Portal check box, and then click Domain Portal.
- To create pages within a shared Portal, select the Create Portal check box, and then click Domain Page in a Shared Portal.
- To create an associated application directory on the Reporting Server, select the Create Reporting Server Application check box.
Note: If you include the Create Reporting Server Application option, you need to create and implement an authorization strategy that grants domain users appropriate access to application directories on the Reporting Server. For more information, see Understanding Access Control Templates in the Security and Administration technical content.
As you select or clear these check boxes, WebFOCUS dynamically updates the value in the Name field to remove characters that are not allowed for resource names.
- When your selections are complete, click OK.
You receive a message that WebFOCUS is running the resources template.
- When you receive a message stating that the new domain has been created, click OK.
Assigning Users to an Indexed Domain
Indexes are assigned directly to domains, and are available only to the users who are also assigned to the Basic User, Advanced User, or Development group in those domains. For information about how to assign a user to a domain group, see How to Add a User to a Group in the WebFOCUS Administration and Security technical content.
Assigning Indexes to Domains
When you load data into an index, there are two methods you can use to make the name appear in the Search page.
The first method is to create an index using the same name as the domain for which the index is designed to support, as shown in the following image.

The index, with the domain name assigned to it, appears in the lucene_index directory.
For more information on how to create an index, see the Magnify Search Developers Guide.
Assigning Indexes to Collections
The collections.xml file is located in the drive:\ibi\WebFOCUS82\config\magnify directory. You can edit this file to map a name of a collection to multiple indexes using different names. By assigning a multiple indexes to a collection, and then assigning that collection to a group within a domain, you make indexes of content outside of the domain available to users when working with a particular domain.
<collections>
<group name="humanresources" id="humanresources">
<search lang="en" analyzer="MagnifyAnalyzer" stylesheet="en/
en_stylesheet_peter" id="en_search_cent_sales"/>
<component id="humanresources" member="humanresources"/>
<component id="centurycustomers" member="centurycustomers"/>
<component id="centuryorders" member="centuryorders"/>
</group>
</collections>
<indexes>
<index name="centurycustomers" directory="centuryelectronics
\centurycustomers"></index>
<index name="centuryorders" directory="centuryelectronics
\centuryorders"></index>
</indexes>
In this example, the default indexes of customers and orders for century electronics are made available to users assign to the Human Resources group.
This method allows you to join multiple indexes into a single collection, or move indexes onto other physical disks, because all of the data cannot fit on a single disk.
For performance reasons, if you have many large indexes, you can use multiple physical drives.
| WebFOCUS | |
|
Feedback |