Defining Collections
|
Topics: |
You must edit the following XML configuration files to define collections:
- ibi\webfocusxx\config\magnify\collections.xml
The collections file configures how Magnify processes, matches, and organizes search information. The collections.xml file is not available after an installation. If one does not exist already, it is automatically generated after initiating a Magnify search or during the indexing process. To create a collections.xml file, submit a query to Magnify. Alternatively, you can rename the \ibi\webfocusxx\config\magnify\collections.xmltemplate file to collections.xml.
- One of the following
Magnify XSLT style sheets. These style sheet file contain settings
that control the look and behavior of the Magnify front-end interface.
- ibi\webfocusxx\config\magnify\included_stylesheet.xslt
- ibi\webfocusxx\config\magnify\locale\locale_stylesheet.xslt
This file contains language-specific text displayed on the Magnify front-end interface. It references the included_stylesheet.xslt file.
The collections.xml file:
- Defines text analysis on the data to be searched.
- Binds language attributes defined in the browser to style sheets.
- Performs logical joins of data from different data sources.
- Defines the location of the indexes on physical disk drives.
Note: Make sure to backup these files before you make edits. You should validate these files after you make edits using tools, such as Internet Explorer®. All edits must be saved in a UTF-8 format. After making the changes to the collections.xml file and Magnify style sheet, restart the application server.
Configuring the Magnify Environment in the Collections File
|
Topics: |
|
How to: |
|
Reference: |
Magnify search results can be enhanced by configuring several attributes for each collection or index in the collections.xml file.
The collections.xml file contains the following sections:
- Analyzers. Assigns methods to process text.
- Defaults. Defines analyzers and style sheet configurations.
- Collections. Defines groups of index libraries.
- Indexes. Explicitly references index libraries not found in the Lucene index directory (\ibi\WebFOCUSxx\magnify\lucene4_index).
Magnify Analyzers
Analyzers are used to process text strings so that the most relevant information is stored in the index and returned to the Magnify search application. An analyzer is a configured set of rules that breaks up text strings into tokens. For example, the Standard analyzer breaks apart a sentence at each space and makes all characters lowercase. This results in multiple tokens represented by each word in lowercase. This occurs first at indexing time and then again on each search submission. When a group of terms is searched, they are passed through the same analyzer, resulting in tokens created in the same manner as those indexed. Search tokens are then matched with indexed tokens. Therefore, to correctly match searches with indexed content, the same analyzer used to index content must be used to search the index. Magnify supports all preconfigured Lucene and Solr analyzers that are core to the Lucene index engine, as well as custom analyzers. For more information on the available Solr analyzers, see the Solr website:
To review how an analyzer configuration works, enter the following URL in a browser:
http://host:port/context_root/search?analyzertest=1
where:
- host:port
-
Specifies the host and port where Magnify is installed.
- context_root
-
Is the WebFOCUS web application alias.
For more information on testing different analyzers, see How to How to Test an Analyzer.
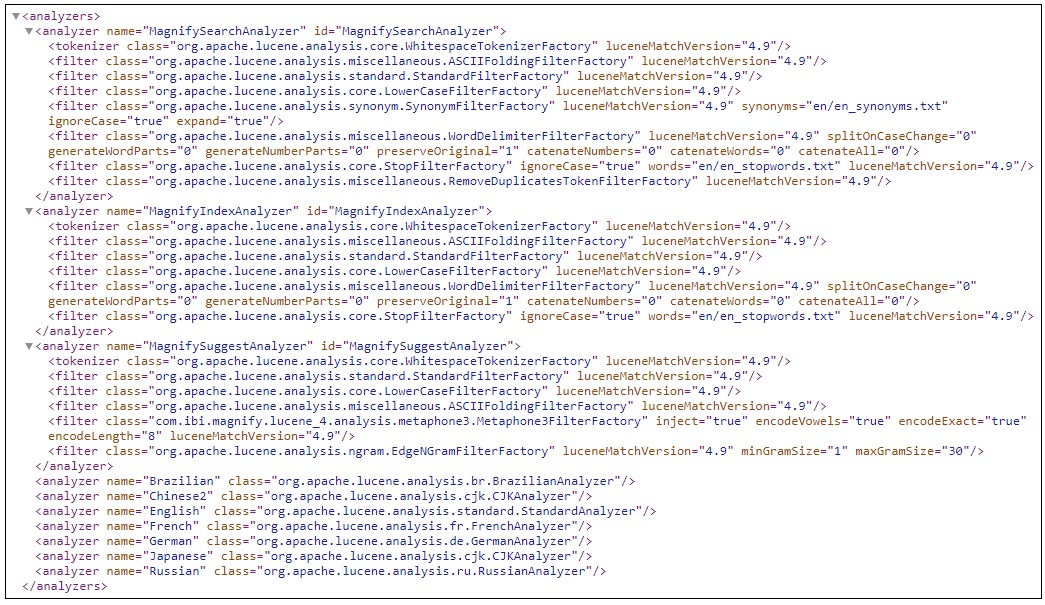
The Analyzers section lists all available analyzers for the current collections.xml file. However, they are not used until they are assigned to specific defaults, collections, and indexes.
The Standard analyzer, which contains a set of methods to create tokens from search content and submissions, is the most comprehensive core analyzer of Lucene. The following image illustrates the Lucene Standard analyzer configured in the collections.xml file Analyzer section.
The CJKAnalyzer supports Chinese, Japanese, and Korean languages. This analyzer uses bigram to create an index. The CJK string becomes two CJK characters in an index. Therefore only two CJK characters can be searched and made a stop word with this index.
For more information on this analyzer, see the following website: https://lucene.apache.org/core/4_0_0/analyzers-common/org/apache/lucene/analysis/cjk/CJKAnalyzer.html
This analyzer is included in the Analyzers section of the collections.xml file, by default. It is included in the list of other language-based analyzers.
For more information on the analyzers, see the following websites:
Reference: Custom Analyzers
Analyzers can be customized to include additional rules. For example, words may be reduced to their roots, thereby creating singularity with plurals and reductions to a single-base tense. This helps minimize variation in words in order to increase matches. For example, matching productivity, production, products by searching for the term product. Therefore, as content is indexed with Magnify, each word is associated with its possible permutations of itself after being processed by the analyzer. You can also build your own analyzer by configuring filters and tokenizers to refine the search behavior in the Magnify application.
The analyzer name is case-insensitive. For each analyzer, you must define one tokenizer and any number of filters. Each filter can contain attributes that can be configured to enhance the search. For more information on each tokenizer, filter and its attributes, see the Apache Lucene website.
By default, Magnify provides the MagnifyAnalyzer custom analyzer. It is configured as a default value in the collections.xml file and contains the following tokenizer and filters.
<analyzer name="MagnifyAnalyzer" id="MagnifyAnalyzer">
   <tokenizer />
     <filter />
     <filter />
     <filter/>
     <filter
        splitOnCaseChange="0" generateWordParts="0"
        generateNumberParts="0" catenateNumbers="0"
        catenateWords="0" catenateAll="1"/>
     <filter ignoreCase="true"
          words="en/en_stopwords.txt"/>
     <filter/>
</analyzer>
The MagnifyAnalyzer provides the following functionality during the search process:
- WhitespaceTokenizerFactory. Tokenizes each search term using whitespace as a delimiter.
- ASCIIFoldingFilterFactory. Converts the search string to ASCII characters.
- StandardFilterFactory. Removes dots and apostrophes.
- LowerCaseFilterFactory. Converts each letter in a search term to lowercase.
- SynonymFilterFactory. Handles synonym mapping.
- WordDelimiterFilterFactory. Splits tokens at word delimiters. For more information, see https://wiki.apache.org/solr/AnalyzersTokenizersTokenFilters#WordDelimiterFilter.
- StopFilterFactory. Removes common words defined in the en_stopwords.txt file.
- RemoveDuplicatesTokenFilterFactory. Removes duplicate tokens.
Note: The collection_reference.xml is provided with the Magnify installation and contains additional default, customized, and other language-based analyzers. This should be used only after a thorough review of how it is applied to content made available with Magnify search.
Reference: Configuring Stop Words
You can configure Magnify to filter out common words when indexing and/or searching. These are known as stop words, and they can save disk space, increase search performance, and enhance the search by returning more relevant results. To configure the Magnify stop words feature, you must define the words that the search engine must filter out in the stopwords.txt file and add the StopFilterFactory filter in the collections_reference.xml file. Stop words can be defined for multiple languages by configuring the locale-specific configuration file and defining it for the appropriate analyzer.
Procedure: How to Configure Stop Words
- Create
the locale_stopwords.txt file in the \ibi\WebFOCUSxx\config\magnify\locale directory.
where:
- locale
-
Is a two-letter language code used to identify the locale of the language-specific folder and stopwords.txt file.
By default, there is an en_stopwords.txt file in the \ibi\WebFOCUSxx\config\magnify\en directory.
- Edit the
stop words configuration file and add the words to filter out when
indexing or searching.
One word must be defined for each line. For example:
a
an
and
are
as
at
be
but
by
- Edit the
\ibi\WebFOCUSxx\config\magnify\collections_reference.xml
and add the following syntax to the appropriate analyzer:
<filter words="configuration_file" ignoreCase="true"/>
where:
- configuration_file
-
Is the location of the stop words configuration file. For example, en/en_stopwords.txt.
The following is an example of the analyzer that contains the StopFilterFactory filter:
<analyzer name="textTight" id="texttight"> <tokenizer/> <filter ignoreCase="true" words="en/en_stopwords.txt"/> <filter/> <filter/> </analyzer> - Restart the application server.
Reference: Configuring Synonyms
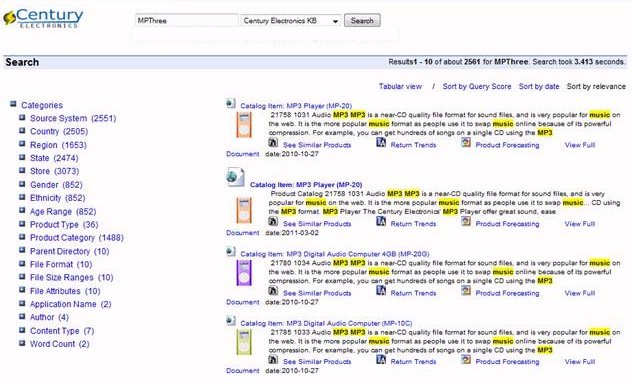
Synonyms can expand a user search by including words that have similar meaning in the search result. For example, the search term MPThree can return search results that include the term MP3 and music. Synonyms can also be used to account for commonly misspelled words. To use the synonyms feature, you must add the solr.SynonymFilterFactory filter to the analyzers configured for your index or collections. The synonyms can be added to a file that is specified as an attribute in the filter. By default, there is a synonym file in the \ibi\WebFOCUSxx\config\magnify\en directory that includes examples of the syntax required to specify a synonym for a specific search term.
The following image illustrates the synonyms that are included in the search results when the search term MPThree is specified in the Century Electronic sample search application:
Procedure: How to Configure Synonyms
- Create
the locale_synonyms.txt file in the \ibi\WebFOCUSxx\config\magnify\locale directory.
where:
- locale
-
Is the language-specific folder where the synonym configuration file is located for each locale.
By default, there is an en_synonyms.txt file in the \ibi\WebFOCUSxx\config\magnify\en directory.
- Edit the
synonyms configuration file and specify the synonyms for one or
more search terms.
For example,
LCD => TFT, DVD
Television=> Televisions, TV, TVs
or
mp3,m3p,mpthree,itunes,music
- Edit the
\ibi\WebFOCUSxx\config\magnify\collections_reference.xml
and add the following syntax to the appropriate analyzer:
<filter words="configuration_file"
     				ignoreCase="true" expand="true"/>
where:
- configuration_file
-
Is the location of the synonyms configuration file. For example, en/en_synonyms.txt.
The following is an example of the analyzer that contains the SynonymFilterFactory filter:
<analyzer name="textTight" id="texttight">
  <tokenizer/>
  <filter ignoreCase="true" words="en/en_stopwords.txt"/>
  <filter words="en/en_synonyms.txt" ignoreCase="true" expand="true"/>
  <filter/>
	 <filter/>
</analyzer>
Note: Once the filter is added to the analyzer, the content must be re-indexed to include the synonyms specified in the configuration file.
- Restart the application server.
Reference: Default Settings
The collections.xml file defines the default analyzer and style sheets used during indexing and searching based on incoming language parameters. The default collections.xml file defines the Standard analyzer and style sheet as the default. However, if another language is detected, alternate language-specific analyzers and style sheets are used.
By default, Magnify includes a standard analyzer for the following languages:
- Chinese
- English
- French
- German
- Japanese
- Mandarin
- Portuguese
- Russian
- Spanish
Magnify selects the language analyzer using the Accept-Language field contained in the indexed data or the Accept-Language HTTP header field when a query is submitted. The value of the Accept-Language parameter is mapped to the lang attribute defined in the index or collection configured in the collections.xml file. The collection and index may also contain the names of the analyzer and style sheet that must be used.
Magnify selects the appropriate language analyzer using the Accept-Language fields contained in the incoming document being indexed or in the browser HTTP header when submitting a search query. The value of the Accept-Language parameter is mapped to the lang attribute defined in language_defaults element. The following image illustrates the default settings for each language Magnify supports.
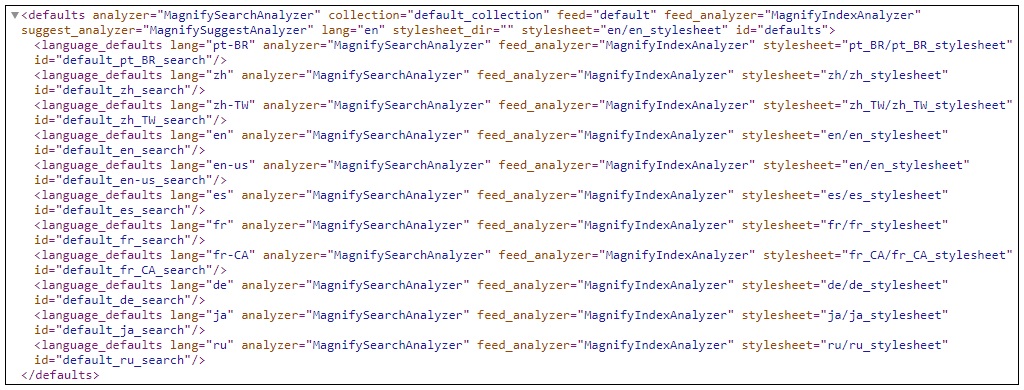
The language_defaults element assigns language-specific analyzers and style sheets to be used when using international browsers. If the language setting is the same as the browser Accept-Language header value, Magnify uses the attributes defined in language_defaults element. Otherwise, the attributes assigned to the default tag are used.
The Accept-Language field value is configured in one of the following ways:
- In iSM when feeding
data to the Lucene index. The lang attribute value is defined in
iSM using the HTTP-HEADER field called Accept-Language. If the Accept-Language
field is not defined in iSM, the locale language attribute is used,
if a default language value is not already configured. The lang
attribute and its analyzer are configured in the collections.xml
for each data source as follows:
<feed datasource="index1" lang="en" analyzer="English" id="index1_feed_english"/>
The following syntax provides an option of feeding all data sources to a single index, if the data source name is not defined. If a data source name is not defined, and the wildcard option (which is indicated by an asterisk *) is not configured , a new index directory is created and loaded. This creates an implicit index.
<feed datasource="*" lang="en" analyzer="English" id="index2_feed_english"/>
- Retrieved from the
browser HTTP-HEADER Accept-Language field. During a search, the
value of the Accept-Language variable is mapped to the same value
defined by a lang attribute in an index or collection in the collections.xml
file. The corresponding analyzer and style sheet are then applied
to the search results.
The following syntax in collections.xml defines the analyzer and style sheet for each language during a search:
<index>
<search lang="en" analyzer="English" stylesheet="magnify_stylesheet" />
<search lang="ja" analyzer="Japanese" stylesheet_dir="c:/ibi/mag/styles" stylesheet="japanese" />
</index>
- The language_defaults element assigns language-specific analyzers and style sheets to use when using international browsers. If the language setting is the same as the browser Accept-Language header value, Magnify uses the attributes defined in language_defaults element. Otherwise, the attributes assigned to the default tag are used.
Reference: Collections
Index libraries can be explicitly joined together in the collections.xml file. Each group contains one or more components, which reference implicit collections (subdirectories with an index one-level deep, under the Magnify Lucene index directory) or indexes.
Magnify is configured to use a default collection, which includes all generated index libraries located under the Magnify root directory by specifying the wildcard (.*) as the member value. The period (.) is used to define the root directory as defined by magnify_root parameter in the WebFOCUS Administration Console. You can also specify a root word and then the wildcard (.*). For example, cent.* searches all implicit and explicit index libraries beginning with cent., such as centstarts, centsales, and cents.
The following image illustrates examples of collections.
The following image illustrates the Magnify default collection defined in the collections.xml file.

A group can have only one wildcard member and one or more named members. One member must be named. A member can be an implicit collection, a wildcard reference, or an index. If a named member does not exist, a warning message is logged in the application server log file.
The collections_century.xml file is provided with the Magnify installation and is used by the Century Electronics sample search application. It defines the indexes and style sheet for the sample Century Electronics search application. For more information on the Century Electronics sample search application, see Magnify Demo Search Application.
Procedure: How to Define Collection Groups
- Open the collections.xml file located in the config/magnify directory.
- Locate the <collections> tag.
- Define collections using the <group> tag. The following
example shows the definition of the joined collections oneandtwo and onetwoandthree.
When editing the collections file, you should check the syntax by opening the file in Internet Explorer before restarting the application server. You should also check the application server log for messages about syntax errors.
<collections>
   <group name="oneandtwo" id="oneandtwo">
      <component id="one" member="one"/>
      <component id="two" member="two"/>
   </group>
   <group name="onetwoandthree" id="onetwoandthree">
      <component id="onetwo" member="oneandtwo"/>
      <component id="three" member="three"/>
   </group>
</collections>
You can also define a wildcard collection that dynamically includes all indexes defined in the index folder. The following example includes all existing indexes that begin with the word plant (plant, plant1, plant2, plant3) in the centuryplants collection.
<collections>
   <group name="centuryplants" id="centuryplants">
      <component id="plant.*" member="plant.*"/>
   </group>
</collections>
Using the wildcard syntax also enables you to account for Magnify indexes that are partitioned dynamically and labeled automatically.
Note: The group name must be different from the member value.
Reference: Indexes
Indexes are used to also define explicit index libraries by referencing their physical locations. Absolute and relative paths can be used. Network drives can be added through network path configurations. There is no limit to the number of indexes that can be defined, but at the minimum, one is required. This can then be referenced from collections or the style sheet.
Procedure: How to Define Explicit Indexes
- Open the collections.xml file, located in the config/magnify directory.
- Locate the <indexes> tag.
- Define
the directories that contain your indexes. For each index, add an <index>
tag that defines the index name and the directory where it is stored.
The following example shows the definitions for four indexes: default_collection,
one, two, and three.
<indexes>
  <index name="default_collection" directory="."/>
  <index name="one" directory="c:/one"/>
  <index name="two" directory="d:/two"/>
  <index name="three" directory="e:/three"/>
  <index name="four" directory="level1\level2" />
</indexes>
Note:
- There is no limit to the number of index tags you can add, and indexes can reside in different locations on different disk drives.
- Network drives can be added through network path configurations.
- You can specify references relative to the Magnify Lucene index directory.
Defining Collections in the Style Sheet
To add the collections that you want to appear in the Magnify search page drop-down list, you must edit the following variables in the Magnify style sheet (locale_stylesheet.xslt):
- collections_description variable. Identifies the collection name that will appear in the drop-down list.
- collections_values variable (case-sensitive). Identifies one or more implicit or explicit index libraries. This value is passed with the Magnify &site parameter value.
The Magnify style sheet is located in the \ibi\WebFOCUSxx\config\magnify\locale directory. The following is an example of the style sheet collection variables defined with names and values.
<xsl:variable name="collections_descriptions">
  <xsl:choose>
    <xsl:when
         test="/GSP/PARAM[@name='collections_descriptions']/@value!=''">
      <xsl:value-of
          select="/GSP/PARAM[@name='collections_descriptions']/@value"/>
    </xsl:when>
    <xsl:otherwise>Corporate,Sales,HR,Orders,Widgets,</xsl:otherwise>
  </xsl:choose>
</xsl:variable>
<xsl:variable name="collections_values">
  <xsl:choose>
    <xsl:when
         test="GSP/PARAM[@name='collections_values']/@value!=''">
      <xsl:value-of
           select="/GSP/PARAM[@name='collections_values']/@value"/>
    </xsl:when>
    <xsl:otherwise>corporate,sales,hr,orders,widgets,</xsl:otherwise>
  </xsl:choose>
</xsl:variable>
To enable the collections feature, you must edit the following variable in the \ibi\WebFOCUSxx\config\magnify\included_stylesheet.xslt
<xsl:variable name="show_collections">1</xsl:variable>
The show_collections variable exposes (set to 1) or hides (set to 0) the collections drop-down list in the Magnify search page.
Note:
- The entries for the names and values in the collection variables must correspond to each other and appear in the same order. That is, description 1 must match value 1, description 2 must match value 2, and so on.
- A comma (,)
must be added to the end of the variable entries and before the
closing variable tag, as shown in the following example:
<xsl:otherwise>corporate,sales,hr,orders,widgets,</xsl:otherwise>
- Do not add spaces in the collection_values variable. Magnify interprets spaces to be part of the variable value and will not be able to locate the intended index.
In this example, the Magnify user will see the following in the Collections drop-down list:
- Corporate
- Sales
- HR
- Orders
- Widgets
You can join indexes or collections so that the user can select a single item from the drop-down list that will search across two or more specific indexes or collections. To join collections dynamically:
- In the collections_description variable, add the name for the combined collections that you want to appear in the Magnify search page.
- In the collections_values variable, add a vertical bar between the collections you want to join.
For example, you can join the Sales and Widgets collections, as shown in the following syntax.
<xsl:variable name="collections_descriptions">
  <xsl:choose>
    <xsl:when
         test="/GSP/PARAM[@name='collections_descriptions']/@value!=''">
      <xsl:value-of
          select="/GSP/PARAM[@name='collections_descriptions']/@value"/>
    </xsl:when>
    <xsl:otherwise>
        Corporate,Sales,HR,Orders,Widgets,Sales and Widgets,
    </xsl:otherwise>
  </xsl:choose>
</xsl:variable>
<xsl:variable name="collections_values">
  <xsl:choose>
    <xsl:when
         test="GSP/PARAM[@name='collections_values']/@value!=''">
      <xsl:value-of
          select="/GSP/PARAM[@name='collections_values']/@value"/>
    </xsl:when>
    <xsl:otherwise>
        corporate,sales,hr,orders,widgets,sales|widgets,
    </xsl:otherwise>
  </xsl:choose>
</xsl:variable>
| WebFOCUS | |
|
Feedback |