Other WebFOCUS Repository Utilities and Tasks
|
Topics: |
This section describes lesser used WebFOCUS Repository related information, utilities, and tasks.
WebFOCUS Repository Table Creation
|
How to: |
The table creation utility creates or drops and creates all repository tables. To drop and re-create only specific table groups, you can use utilities available with your database software. This is useful if you wish to remove all library data, but keep your schedules and address books.
Procedure: How to Create the WebFOCUS Repository Tables
- Ensure that the database server is running.
- Launch the Command Prompt with the Run as administrator option.
If you receive a message asking if you want to allow this app to make changes to your PC, click Yes.
A Command Prompt window opens, which allows you to create tables or to drop and re-create tables.
- In the Command Prompt window, navigate to drive:\ibi\WebFOCUS 82\utilities\WFReposUtil.
- Type WFReposUtilCMDLine.bat, and then press the Enter key.
This utility also generates the WFReposUtilCMDLine.log file in the same location.
The utility uses the connection and sign-in information provided during the installation of WebFOCUS.
- Type a selection from the following list of available options, and press the Enter key to continue.
Option 4 create_insert is the default selection.
- 1) create
- 2) create_or_extend
- 3) insert
- 4) create_insert
- 5) update
- 6) drop
- 7) extract
- 8) create_ddl
- Q) quit
- If you typed option 3, insert, or option 4, create_insert:
- When you receive a prompt to enter the Database Repository Username, type the name of a valid user that has permission to create and alter tables in your database Repository, and then press Enter.
- When you receive a prompt to enter the Database Repository Password, type the Password associated with the valid Database
Repository user that you typed in sub-step a, and then press Enter.
These values give the utility the authority to open the Database Repository and execute the insert or create insert commands.
- When you receive a prompt to enter the WebFOCUS Administrator ID, type a new User ID, and then press Enter.
- When you receive a prompt to enter a Password for the ID entered, type a new Password, and then press Enter.
These values become the new WebFOCUS Administrator User ID and Password. Be sure to type a User Name and Password that you can refer to in future operations.
Note: The special characters ^ $ % " are not permitted in the WebFOCUS Administrator User ID or Password during the create process.
- If you typed any other option:
- When you receive a prompt to enter the Database Repository Username, type the name of a valid Database Repository user that has permission to create and alter tables in your database, and then press Enter.
- When you receive a prompt to enter the Database Repository Password, type the Password associated with the valid Database
Repository user that you typed in sub-step a, and then press Enter.
These values give the utility the authority to open the Database Repository and execute the command you typed in step 7. Therefore, the User ID you type must have permission to create and alter tables in your database.
- If you receive a message listing an error and stating that the creation of the WebFOCUS Repository failed, open the WFReposUtilCMDLine.log
file and review the log to identify the specific error messages that occurred at the time the utility terminated.
Error messages can be generated by connection failures, the presentation of invalid database credentials, or failed attempts to connect to an inaccessible database.
- If you receive a message stating that the creation of the WebFOCUS Repository completed successfully, type Exit to close the
Command Prompt window.
Note: If you can connect to the database, but cannot create tables, ensure that the ID you typed for the database during the WebFOCUS installation has create permissions. You can change this User ID, as explained in Post-Installation Verification and Configuration.
Changing the WebFOCUS Repository
|
How to: |
If you wish to change repositories, you must adjust the connection parameters:
- CLASSPATH (parameter that specifies the location of the JDBC driver used for the selected WebFOCUS database)
- JDBC CLASS. Stored in install.cfg parameter: IBI_REPOS_DB_DRIVER
- JDBC URL. Stored in install.cfg parameter: IBI_REPOS_DB_URL
- Credentials. Stored in install.cfg parameters: IBI_REPOS_DB_USER and IBI_REPOS_DB_PASSWORD
If you are using the same database server and just wish to change repositories, you normally only need to change the JDBC URL or credentials. If you are moving between database types (going from WebFOCUS to Db2), you must also adjust the JDBC CLASS and change the driver in CLASSPATH.
Procedure: How to Change Connection Information
- Ensure the
JDBC driver for the new database server is installed on the WebFOCUS
Client and the Distribution Server machines.
The JDBC driver information is stored in the drive:\utilities\setenv\utilsetvars.bat file under the JDBC_PATH parameter.
Note: The value must be enclosed in double quotation marks (") if the path contains a space.
- If this
is a different driver, add the JDBC driver path to the CLASSPATH of
the application server.
For example, for Apache Tomcat, you can use the Start menu by selecting Tomcat Configuration Utility, under the Information Builders app. Then, select the Java tab and add a semicolon (;) plus the full path of the file to the end of the Java Classpath field.
- Restart your application server.
- Modify the install.cfg file and provide updated values for JDBC CLASS, JDBC URL, and Credentials.
Note: The database password will get encrypted after restarting the application server.
- Optionally, sign in to the WebFOCUS Administration Console from the Administration menu to review repository configuration information.
- Click the Configuration tab, expand Application
Settings, and then select Repository.
The Repository pane opens, as shown in the following image.
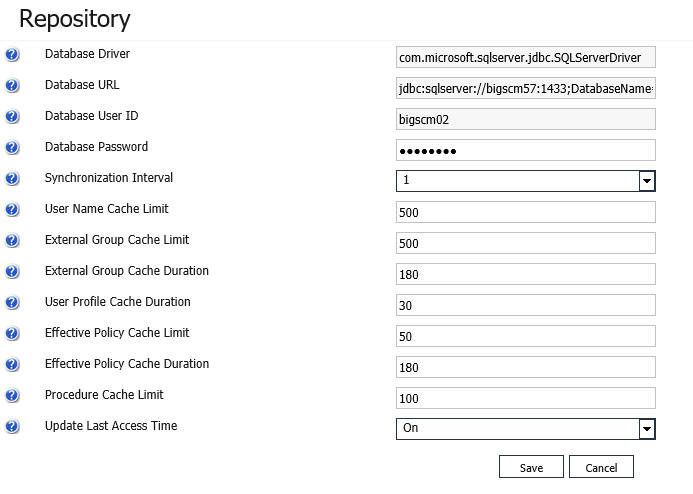
This allows you to see the values entered for the following:
- Database Driver
- Database URL
- Database User ID
- Database Password
Only Database Password can be changed through the Administration Console. The password will get encrypted and written to install.cfg.
- If this
is a different driver, update the JDBC driver path to the following ReportCaster
configuration file:
drive:\ibi\WebFOCUS82\ReportCaster\bin\classpath.bat
and to the following value in the registry:
HKEY_LOCAL_MACHINE\SOFTWARE\WOW6432Node\Information Builders\ReportCaster\WF82\PARAMETERS\JAVA\CLASSPATH
- Restart
the WebFOCUS web application and the Distribution Server.
Note: You do not have to restart the entire application server which may have other applications deployed on it.
| WebFOCUS | |
|
Feedback |