Creating a Synonym With the Connect to Data Wizard
|
Topics: |
The Connect to Data wizard provides a step-by-step process for configuring adapters that connect to data sources that you can use to build reports, charts, and visualizations in InfoAssist+.
Using the Connect to Data wizard, you can perform the following steps:
- Connect to SQL. Configure an adapter, create a new connection, or change connection parameters.
- Import Metadata. Create a synonym for one or more data sources.
- Edit Metadata. Enhance metadata by adding measures, dimensions, and dimension hierarchies.
These steps are displayed in the navigation screen, as shown in the following image. As you complete the tasks for each step, the tool automatically takes you to the next step in the process. If you want to go directly to a specific step, click the step and the corresponding window opens.

You can launch the Connect to Data wizard in one of the following ways:
-
From the WebFOCUS Home Page, on the actions bar, click Connect
 .
.
-
From the Legacy Home Page, in the Resources tree, right-click a domain or folder, point to Metadata, and then click Connect to Data.
-
In the Open dialog box, in InfoAssist+, click Connect to Data.
Step One: Connect to SQL
|
How to: |
The first step in the Connect to Data wizard is creating a connection to your data, which will allow you to modify your data for use in WebFOCUS. You can configure a new adapter or connection, add a connection to an existing adapter, or change adapter connections.
Procedure: How to Configure a New Adapter/Connection
- From the Configure connection screen,
click New Adapter/Connection.
The Configure Adapter screen opens, as shown in the following image.

- Select the radio button for the adapter and click Next.
Note: To sort the available adapters, click the column headers and choose from the available options to sort in ascending or descending order. You can also reset to the original order.
The Add to Configuration screen opens.
- Enter the parameters for the specific adapter and click Configure.
Procedure: How to Add a Connection
- From the Configure connection screen,
click Add Connection.
The Add Connections screen opens.
- Select the radio button for the adapter and click Next.
- Enter the parameters for the specific adapter and click Configure.
Procedure: How to Change a Connection
- From the Configure connection screen,
click Change Connection.
The Edit Connections screen opens.
- Select the radio button for the connection and click Next.
Note: You can click the Adapter, Connection, Connection string, or Profile columns to sort the available connections.
- Change the parameters for the specific connection and click Configure.
Step Two: Import Metadata
|
How to: |
Once you configure a connection, you must select the metadata that you want to import. The first screen that you see is the Select connection to create synonyms screen. Here, you select the connection to your data.
Procedure: How to Import Metadata
- Select the radio button for the adapter
and click Next.
The Select Synonym Candidates screen opens.
- Select or enter the parameters for each screen and click Next.
The Create Synonym screen opens.
- Select one or more synonym check boxes.
- Click Next.
The synonyms are created in the application directory.
Step Three: Edit Metadata
Using the first screen in this step, you can manage and enhance your metadata as required, to simplify and enrich future analytics. This screen shows you the default breakdown of your data depending on the BV+ mode you have set in the Web Console parameter, AUTO_BV_NAMESPACE. By default, when you install a new Reporting Server, this parameter is set to OFF, which means that your data is uploaded in BV_NAMESPACE=OFF mode, and is categorized into measures, dimensions, and hierarchies. By default, you can see your fields interpreted as measures and dimensions, as shown in the following image. You can modify the synonym structure by using the ribbon functions and the shortcut menu options available in the Business View Pane.
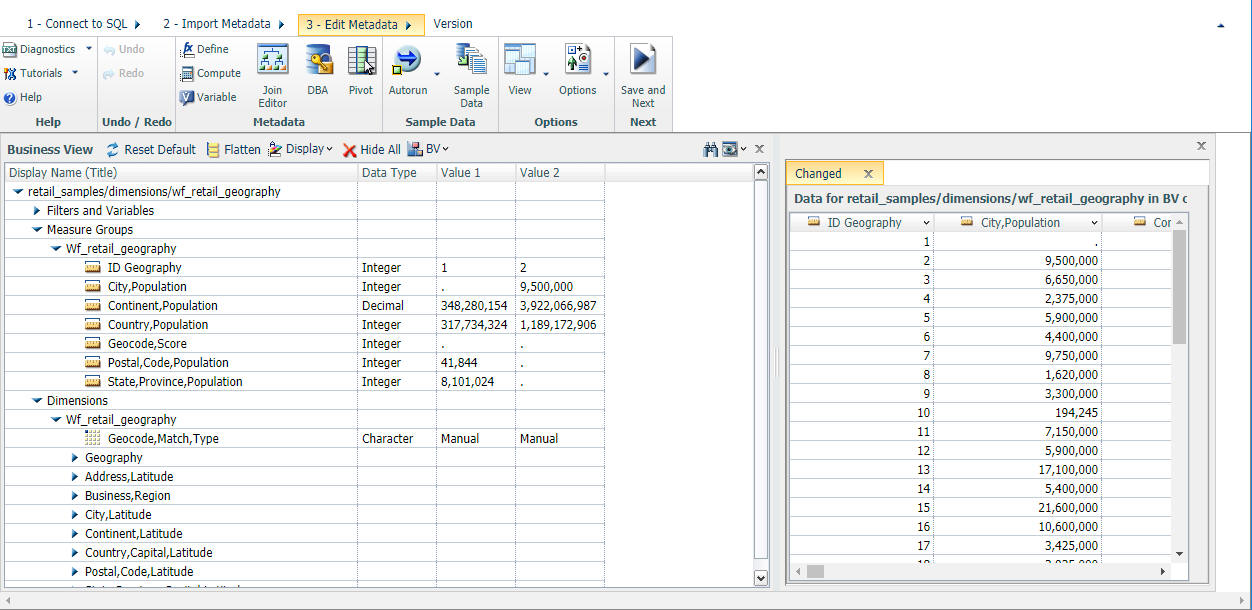
For more information about the options that are available in the Edit Metadata screen in the Connect to Data wizard, see Wizard Metadata Screen Reference.
Related Information:
| WebFOCUS | |
|
Feedback |