Creating a Synonym for Cube Data Sources
|
How to: |
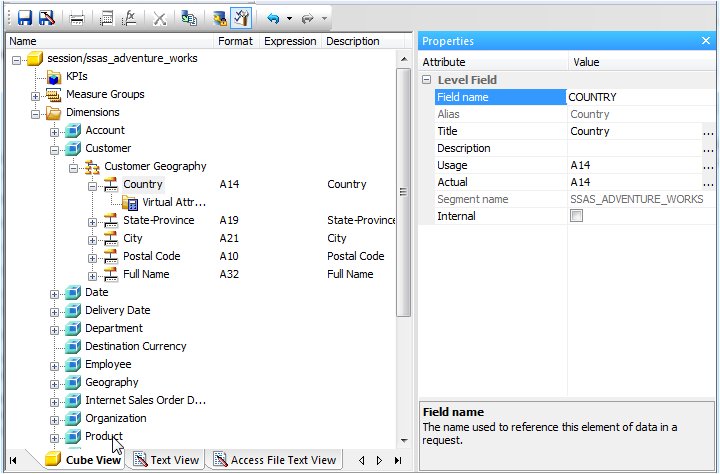
The Metadata canvas enables you to make further modifications to your Cube synonym definitions. The Cube synonym is displayed in the Cube View tab. If you select a component of the synonym, its properties appear in the Properties panel.
You can use the Metadata canvas to:
- Edit field names and titles for measures, properties, and variables. You may also edit the field prefix for the defined fields.
- Edit titles for multiple languages, delete titles, and add titles for additional languages if you are using code page UTF-8.
- Delete measures, dimensions, or parent/child hierarchies.
- View the USAGE and ACTUAL formats and change the USAGE display format for the field.
- Change an internal attribute value.
- Change the access property for variables.
- Change the field prefix used to create the field names, mandatory property names, and DEFINE field names generated for parent/child hierarchies by the Synonym Wizard.
- Create virtual measures (this is implemented with COMPUTE fields in the Master File).
The following image is an example of a Cube data source in the Metadata canvas.
Procedure: How to Edit Field Names and Titles
To edit field names and titles:
- From the Projects or Data
Servers area, open a synonym by double-clicking a Cube Master File
from the Master Files folder.
Note: You may also right-click the synonym and select Edit in Synonym Editor.
By default, the Metadata canvas opens to the last view used.
- Select an attribute from the Cube View tab.
Note: The attributes available depend on the type of synonym.
- Click FIELD NAME, TITLE, or CAPTION on
the right-hand side of the workspace.
Note: The Properties panel does not let you make any changes that would render the Master File unusable. Therefore, you cannot edit any value field that is highlighted gray.
- Manually
edit the Field Name, Title, or Caption by typing in the value field.
The edits are updated instantaneously in the Cube View tab.
- Click Save to save the synonym.
Procedure: How to Edit Titles for Multiple Languages
To edit the title for multiple languages:
- From
the Projects or Data Servers area, open a synonym by double-clicking
a Cube Master File from the Master Files folder.
By default, the Metadata canvas opens to the last view used.
- Select an attribute from the Cube View tab.
- Click the browse (...) button,
located on the far right of the TITLE or CAPTION value field.
The Multilingual Titles dialog box opens.
- You may add, edit, or delete
a title for this field.
To add an additional language for the title:
- Select a language from the drop-down list.
- Click Add.
- Type a description for the title field.
To edit an existing specified title:
- Select the title and click Edit.
You may also double-click the title.
- Manually type a title name.
To delete a specified title:
- Select the title and language to be deleted.
- Click Delete.
- Click OK to close the Multilingual Titles dialog box.
- Click Save from the File menu to save the synonym.
Procedure: How to Delete Measures, Dimensions, or Parent/Child Hierarchies
To delete measures, dimensions, or parent/child hierarchies:
- From the Projects or Data Servers area, open a
synonym by double-clicking a Cube Master File from the Master Files
folder.
By default, the Metadata canvas opens to the last view used.
- Select the attribute name that you want to delete.
- Right-click and select Delete from
the shortcut menu.
The attribute is deleted from the Cube View tab.
- Click Save to save the synonym.
Procedure: How to Create Virtual Measures With COMPUTE Fields
To create virtual measures with COMPUTE fields:
- From the Projects or Data
Servers area, open a synonym by double-clicking a Cube Master File
from the Master Files folder.
By default, the Metadata canvas opens to the last view used.
- Open the Measures folder from the Cube View tab.
- Right-click
the Virtual Measures folder, select Insert, and then select Virtual
Measure.
The Compute Calculator opens.
- From the Compute Calculator, type a name for the column in the Name field.
- You may type a descriptive title for the measure (COMPUTE) in the Title field.
- Use the
Expression tab and the calculator buttons to build the expression
for the Measure (COMPUTE field).
or
Use the Relational Expression tab to build the expression.
- From the Relational Expression tab, click the Add New Row button.
- Use the drop-down lists to select the Field, Relation,
and Type.
Note: Parameters are not supported.
- Click the browse (...) button
at the right of the Value input field.
The Value Selection dialog box opens.
- Select from the available values and use the arrows to add or remove values.
- Click OK to close the Value
Selection dialog box and return to the Relational Expression tab.
The expression is added to the virtual measure.
- To add another expression, double-click a measure
or dimension from the Fields/Variables tab on the right side of
the Compute Calculator.
The expression is added to the Relational Expression tab, where you can add the expression value.
- To delete an expression, select the number or field column of the expression and click the Delete button, or right-click it and select Delete selected row(s). The expression is removed from the Relational Expression tab.
- You may click the Check expression and Sample Data buttons, located on the top right of the Compute Calculator, to verify that the expression is valid and to view sample data for the filter.
- Click OK to close the Compute
Calculator and return to the Metadata canvas.
Note: To edit the Compute, Title, or Expression, you may do so directly from the Metadata canvas or you may click the browse (...) button at the right of the EXPRESSION value field to relaunch the Compute Calculator.
| WebFOCUS | |
|
Feedback |