Installation
|
Topics: |
Installing WebFOCUS Business User Edition on a Windows Environment
|
Topics: |
This topic provides the step-by-step instructions that you need to install WebFOCUS Business User Edition (BUE).
You can begin using WebFOCUS BUE immediately after you install the product. No additional configuration steps are required.
WebFOCUS Business User Edition System Requirements for Windows
|
Topics: |
To install WebFOCUS BUE, you must have administrator privileges. Additionally, your machine must meet the system requirements that are defined in the Hardware and Software Requirements topics.
Hardware Requirements
- Quad-core processor, 2.5 GHz minimum per core is recommended.
- 16 GB of RAM or higher is recommended for optimal performance. 8 GB of RAM minimum.
- 8 GB of free disk space.
- Ensure that the Windows page file is properly configured and that is set to Automatically manage paging file size. For Windows 64-bit, the recommended paging file size is three times the size of the RAM.
Software Requirements
- Windows 10, 8.1, 7, Windows 2012, 2012 R2, or 2008
R2 Service Pack 1 Server editions.
Note: The Windows 10 Anniversary upgrade Version 1607 (OS Build 14398.82) is not supported. This version causes Hyperstage to become unstable and disconnect.
- 64-bit Version of Windows.
- Supported browsers: Internet Explorer® 11, Microsoft Edge®,
Google Chrome™ (latest version), Mozilla Firefox® (latest version).
Note: Accessibility Compliance is not supported at this time.
Installing WebFOCUS Business User Edition
|
How to: |
This section describes how to install WebFOCUS BUE.
Procedure: How to Install WebFOCUS Business User Edition
- Download the installation files.
- Double-click installWebFOCUS_BUE8201.exe.
Note: Java Version 8 Update 102 (8u102) and Tomcat 8.0.36 are included with the WebFOCUS BUE product installation.
The InstallAnywhere installation program opens, as shown in the following image.
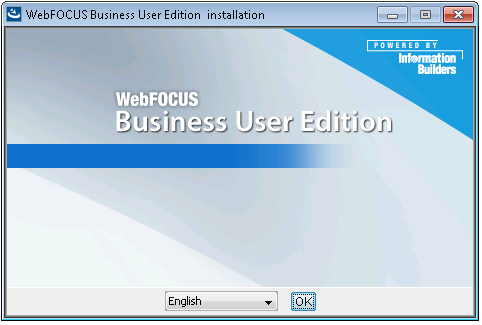
- Choose the appropriate language from the drop-down list
and click OK.
The list of languages depends on the regional language settings of the Windows Operating System where WebFOCUS BUE is being installed.
Note: The language selected will be the language used during the installation program. This language is also used to set the code page of the Reporting Server, which is responsible for data access.
If your data sources are in a different language, you will have to change the code page of the Reporting Server.
The Welcome window opens.
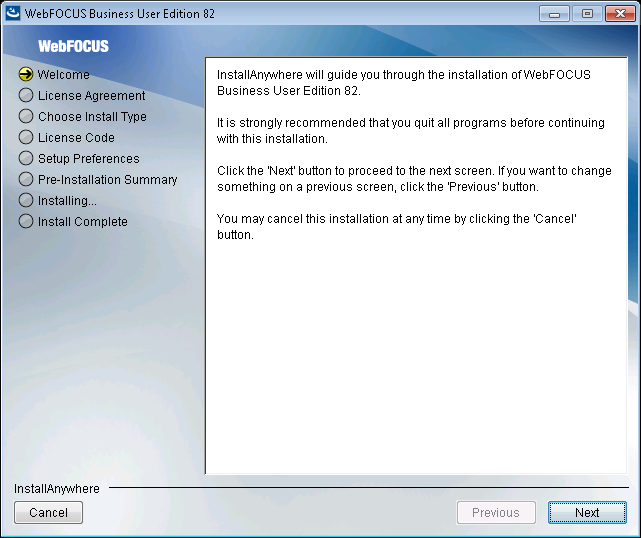
- Click Next to continue.
The License Agreement window opens.
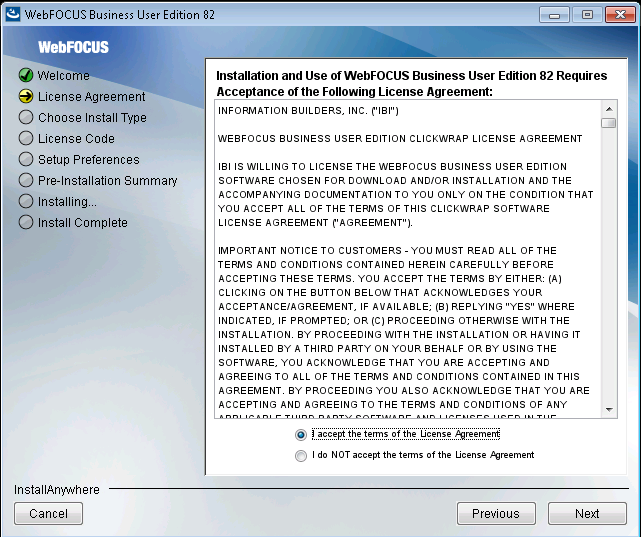
- Click I accept the terms of the License Agreement,
and then click Next.Note:
- Only one installation per platform is supported.
- If you have an earlier release of WebFOCUS BUE installed on your machine, you will be prompted to update your installation. To perform a full or new installation, you must quit the installation program, uninstall the existing version, and perform a new installation. When you uninstall WebFOCUS BUE, all components are removed from your directory structure, except the WebFOCUS BUE Reporting Server applications. For more information, see Uninstalling WebFOCUS Business User Edition.
The License Code window opens, as shown in the following image.
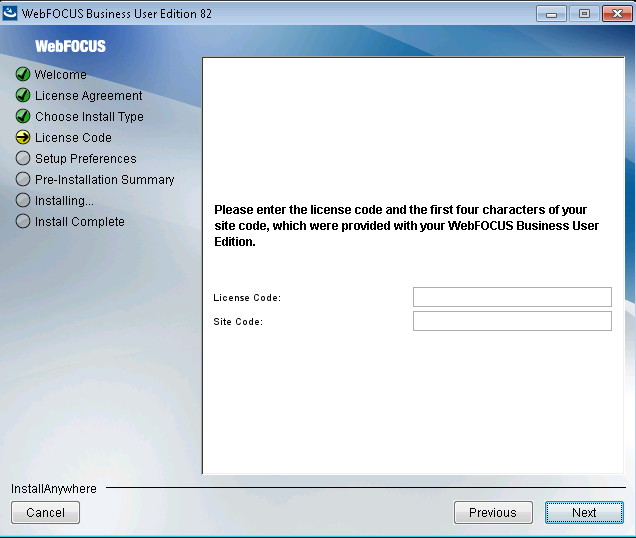
- Type the WebFOCUS BUE license code and first four digits
of the site code that were provided with your copy of WebFOCUS BUE,
and then click Next.
The Setup Preferences window opens, as shown in the following image.
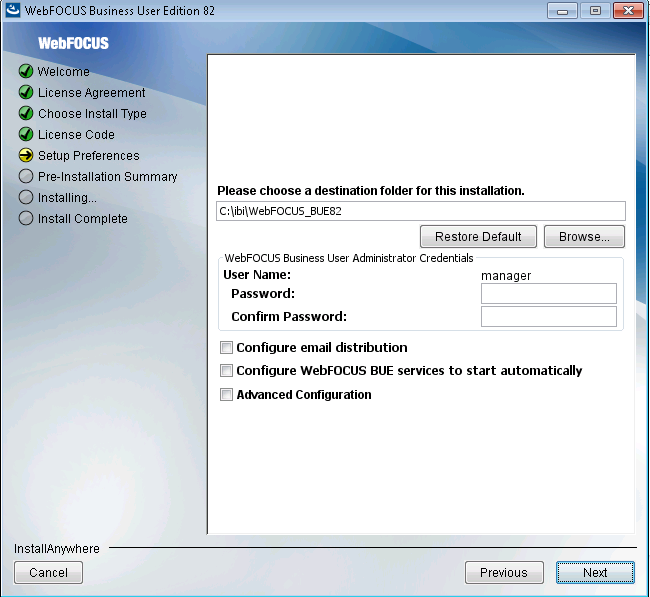
- In the Setup Preferences window, complete the following
steps:
- The installation program preconfigures a
user name, but requires that you type a password. You must complete
the User Name credentials section to proceed with the installation.
In the Password field, type a password, and then confirm your password.
Note: Passwords must be between 4 and 20 characters and cannot include double quotation marks (") or a percent sign (%). Leading blanks and trailing blanks will be removed.
- Optionally, select the Configure email distribution check box to select the type of Mail Server to be used for report distribution. Valid options are:
- Google. This requires a Google Account Name and Password.
Note: Google may block sign-in attempts when delivering reports through WebFOCUS BUE. To allow WebFOCUS BUE to connect to the Google email account that was configured for email distribution, sign in to the Google account, navigate to My Account settings, select Sign-In & security, and turn the Allow less secure apps option On.
For more information, see:
- Yahoo. This requires a Yahoo Account Name and Password.
- Other. Select this for all other mail servers. This option requires you to type the host name or IP address for your SMTP mail server.
- Google. This requires a Google Account Name and Password.
- Select the Configure WebFOCUS BUE services
to start automatically check box to start the WebFOCUS
BUE services. This sets the services Startup Type to Automatic.
This will ensure that the services required to run the product are
always running, and will not require that you start the services
manually, even if you restart the machine.
If you do not select this option, you can manually start and stop the WebFOCUS BUE services from the shortcut options found in the WebFOCUS Business User Edition 82 group, or through the Windows services program.
- Select the Advanced Configuration check box if you want to customize the location of your Reporting Server applications directory. The default location is \WebFOCUS_BUE82\data\apps.
- The installation program preconfigures a
user name, but requires that you type a password. You must complete
the User Name credentials section to proceed with the installation.
In the Password field, type a password, and then confirm your password.
- Click Next to continue.
The Pre-Installation summary window opens.
Note: If you selected the Advanced Configuration check box, the following window opens.
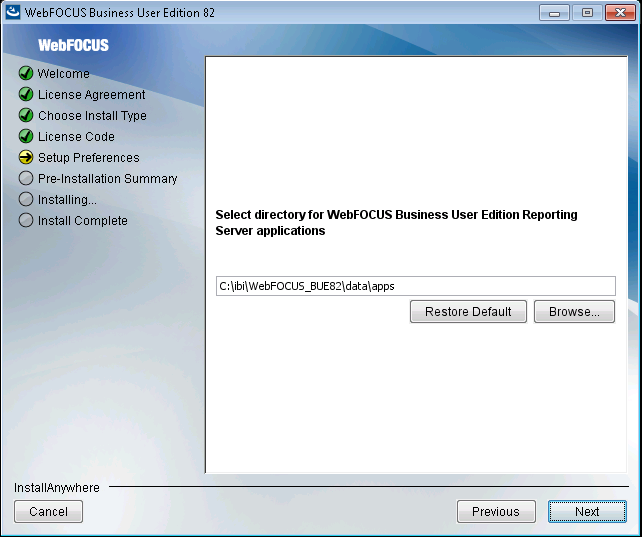
Server applications can be created in the default location or in a new location outside of the drive:\ibi\WebFOCUS_BUE82\ folder. Select the location of your applications and then click Next.
- Confirm that the summary information is correct, and then click Install.
- When the installation completes, click Done to close
the installation program.
The Sign In page opens, as shown in the following image.
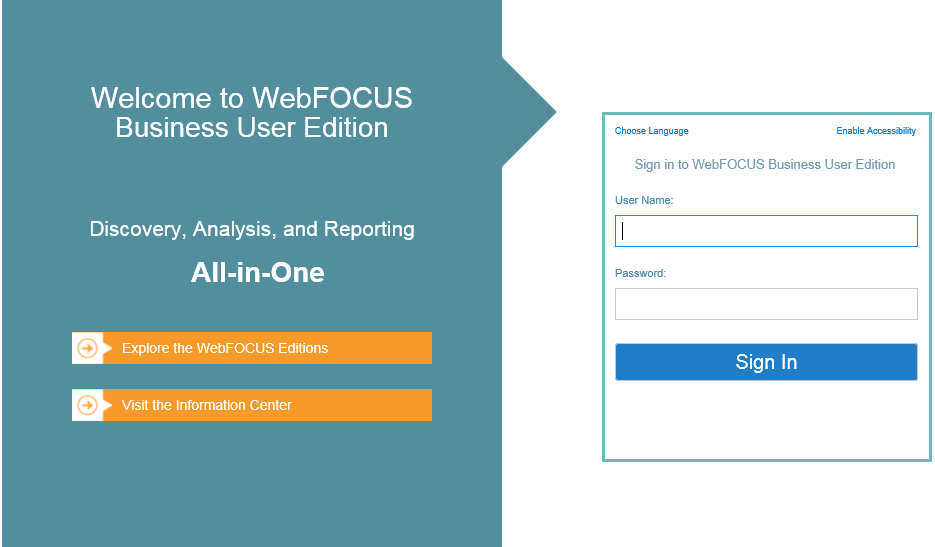
- Sign in using the manager user credentials that you configured during the installation program.
Running WebFOCUS Business User Edition Services Manually
|
How to: |
You should refer to this topic if you did not select the Configure WebFOCUS BUE services to start automatically after a reboot check box during the installation program.
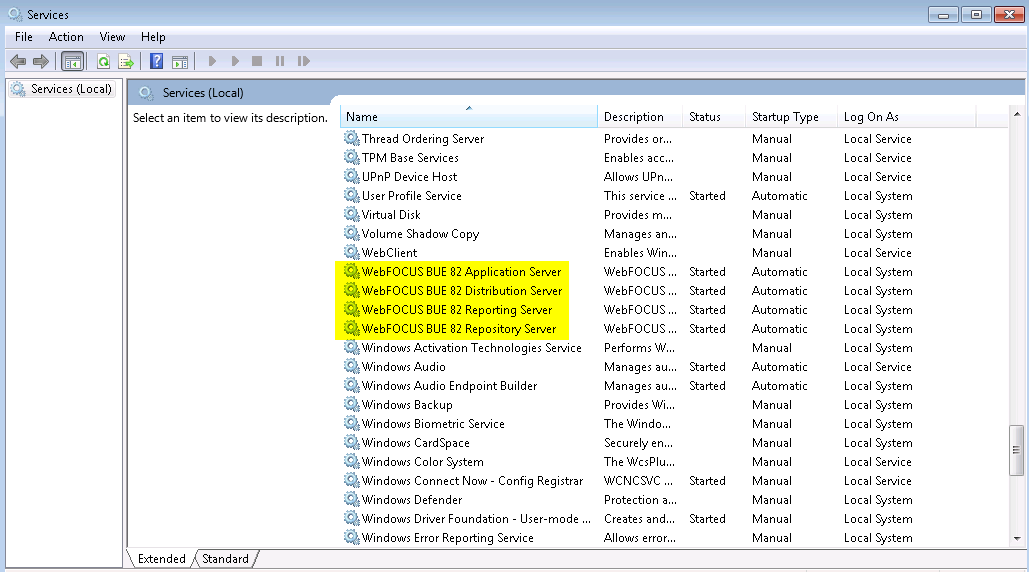
The installation program installs the following services:
- An application server
- A Distribution Server
- A repository server
- A Reporting Server
Note: If you are updating an earlier release of WebFOCUS BUE, you must manually stop all WebFOCUS BUE services before beginning the installation program. For more information, see Running WebFOCUS Business User Edition Services Manually.
To view the status of these services, launch your Windows Services program from the Control Panel, and click the Standard tab. The following image highlights the WebFOCUS BUE services as they appear in the Windows Services program.
|
Display name |
Service Name |
|---|---|
|
WebFOCUS BUE 82 Application Server |
WfBUE82AppSrv |
|
WebFOCUS BUE 82 Distribution Server |
WfBUE82DistSrv |
|
WebFOCUS BUE 82 Reporting Server |
WebFOCUS BUE 82 Reporting Server |
|
WebFOCUS BUE 82 Repository Server |
WfBUE82DbSrv |
Procedure: How to Start or Stop WebFOCUS Business User Edition Services Manually
From the Start menu, navigate to the WebFOCUS Business User Edition shortcut, under the Information Builders program group.
- Click Start WebFOCUS_BUE Services to start the WebFOCUS BUE services.
- Click Stop WebFOCUS_BUE Services to stop the WEBFOCUS BUE services.
Uninstalling WebFOCUS Business User Edition
|
How to: |
If you want to remove an existing WebFOCUS BUE installation and want to perform a full installation of a newer release, you can run the uninstall program.
Note: Before you uninstall WebFOCUS BUE, it is recommended that you save the cleanup utility to a different location on your machine in case the uninstall fails and you need to manually uninstall any components. For more information, see Troubleshooting WebFOCUS Business User Edition.
Procedure: How to Preserve Your Data
The following steps can be performed if you want to preserve your data and perform a new installation, if you need to move your data to another location, or if an upgrade installation fails and you need to perform a new full installation.
- Back up the WebFOCUS BUE repository server and
Reporting Server application folders to a different location on
your machine.
By default, these are located in the following folders:
- drive:\ibi\WebFOCUS_BUE82\derby\WFBUE82\
- drive:\ibi\WebFOCUS_BUE82\data\apps\
- drive:\ibi\WebFOCUS_BUE82\srv\wfs\hs\
- Uninstall WebFOCUS BUE. You can uninstall WebFOCUS BUE from the Start menu, or manually, as described in How to Manually Uninstall WebFOCUS Business User Edition Components.
Procedure: How to Restore and Move Backed Up Data
- Install WebFOCUS BUE.
- After the installation program is complete, do the following:
- Manually stop the repository server service.
- Replace the new repository server and Reporting Server application folders, using the backup directories that you made in step 1 of How to Preserve Your Data.
- Restart the repository server service.
Procedure: How to Uninstall WebFOCUS Business User Edition
- From the Start menu, navigate to the Uninstall shortcut, under the Information Builders Program group.
- Click Uninstall.
The InstallAnywhere installation program opens.
Note: If the uninstall program is not visible from the Windows Start menu, uninstall the software using the Programs and Features option on the Control Panel. Alternatively, create a shortcut to C:\ProgramData\Microsoft\Windows\Start Menu\Programs. This will open Windows Explorer with a classic view of all installed programs. You can use this to navigate to WebFOCUS Business User Edition 82 in the Information Builders folder, and then run the uninstall program.
- In the Uninstall WebFOCUS Business User Edition 82 window,
click Uninstall, as shown in the following
image.
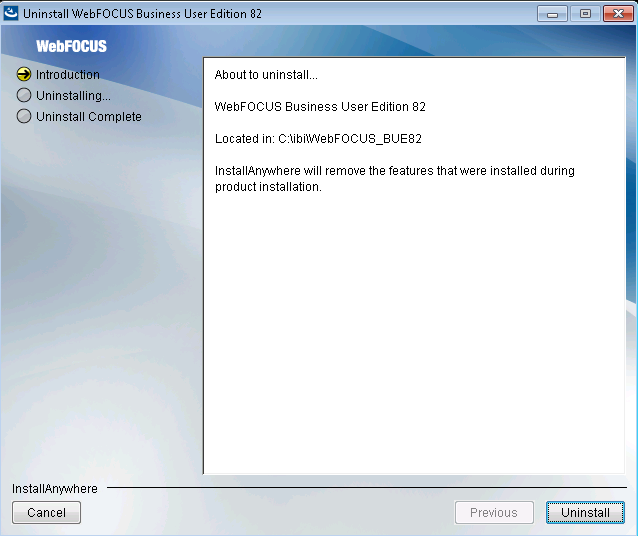
The installation program begins and uninstalls the WebFOCUS BUE components.
Troubleshooting WebFOCUS Business User Edition
|
Topics: |
If you are unable to launch WebFOCUS BUE, ensure that all services are running. If they are not, do the following:
- Stop all services.
- Restart the services, and launch WebFOCUS BUE.
If this does not work, stop the services again. Before you restart the services, ensure that the Hyperstage processes, ibengine.exe and postgres.exe, are also stopped. Restart your machine if you are still unable to restart the services.
Port Assignment
By default, ports in the range of 26000 to 26040 are checked for availability. If the installation program detects that no ports in that range are available, it then increases the range by 10 and checks again for availability. For example, if ports 26000 to 26040 are unavailable, ports 26010 to 26050 are then checked.
Default Port Assignment.
- Ports 26000 to 26003 are used by the application server.
- Port 26010 is used by the repository server.
- Ports 26020 to 26023 and port 26040 are used by the Reporting Server .
- Port 26030 is used by the Distribution Server.
WebFOCUS Business User Edition Log Files
WebFOCUS BUE creates a log file in the following location for Windows 7:
drive:\Users\user_id\WebFOCUS_BUE82_Install_date_time.log
where:
- user_id
-
Is your Windows user ID.
- date_time
-
Is the date and time the log file was created. This log file provides information about the WebFOCUS BUE installation. If you contact Customer Support Services with an installation problem, have this file available.
Troubleshooting the Uninstall Process
|
How to: |
If you choose to uninstall WebFOCUS BUE, and the uninstall process fails, you can follow one of the procedures in this section to clean up your machine before reinstalling the product.
Before performing one of the following procedures, ensure that you have uninstalled WebFOCUS BUE, as described in Uninstalling WebFOCUS Business User Edition.
Procedure: How to Manually Uninstall WebFOCUS Business User Edition Components Using the Cleanup Utility
If the WebFOCUS BUE uninstall process fails, you can run the wf_cleanup.bat file to clean a damaged installation on your machine.
- Navigate to the following location on your machine:
drive:\ibi\WebFOCUS_BUE82\WebFOCUS\utilities\install\
- Copy the wf_cleanup.bat file from the install directory to a different directory (for example, drive:\ibi\).
- Right-click wf_cleanup.bat, and then click Run as administrator.
- When prompted, type the location of the install directory
to proceed.
Note: By default, the utility will back up the Reporting Server apps, data, and the Derby database.
Procedure: How to Manually Uninstall WebFOCUS Business User Edition Components
If the WebFOCUS BUE uninstall process fails, you can do the following to manually cleanup the remaining WebFOCUS BUE components on your machine.
- Stop any running WebFOCUS BUE services on the system, as detailed in How to Start or Stop WebFOCUS Business User Edition Services Manually.
- Remove any remaining services from your machine.
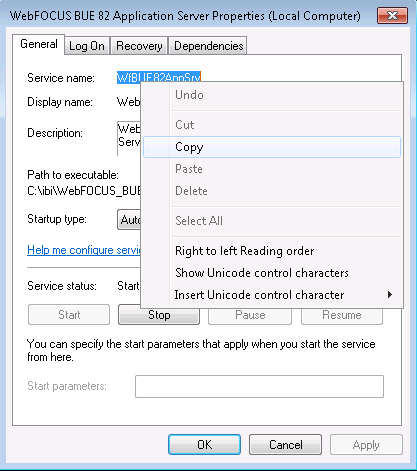
- Locate the existing WebFOCUS BUE services.
To get the service name, right-click the service in the Windows
Services program and click Properties. The
Properties dialog box opens, where you can right-click the service
name and click Copy, as shown in the following
image.
- To remove a service, open the Command Prompt as an Administrator
and issue the following command:
sc delete "service name"
where:
- service name
-
Is the name of the service you are manually deleting. For example:
C:\sc delete "WfBUE82AppSrv"
Note: The service name must be enclosed in double quotation marks (").
Repeat this for the remaining services.
- Locate the existing WebFOCUS BUE services.
To get the service name, right-click the service in the Windows
Services program and click Properties. The
Properties dialog box opens, where you can right-click the service
name and click Copy, as shown in the following
image.
- Open Task Manager and ensure that the process ibengine.exe is not running.
- Remove files from disk, except for the Reporting Server
application folders.
For example, if WebFOCUS BUE is installed on the C:\ drive, remove all folders under C:\ibi\WebFOCUS_BUE82\, except for the following folders:
- C:\ibi\WebFOCUS_BUE82\data\
- C:\ibi\WebFOCUS_BUE82\srv\wfs\hs\
- C:\ibi\WebFOCUS_BUE82\Derby\WFBUE82\
- Click Start, point to All Programs, and expand the Information Builders folder.
- Right-click the WebFOCUS Business User Edition 82 folder and click Delete.
- Launch the Windows Registry Editor, and remove the following
registry keys.
- HKEY_LOCAL_MACHINE\SOFTWARE\WebFOCUS_BUE82
- HKEY_LOCAL_MACHINE\SOFTWARE\Information Builders\Derby\WfBUE82DbSrv
- HKEY_LOCAL_MACHINE\SOFTWARE\Information Builders\WebFOCUS BUE 82 Reporting Server
- HKEY_LOCAL_MACHINE\SOFTWARE\Wow6432Node\Information Builders\ReportCaster\WfBUE82DistSrv
- HKEY_LOCAL_MACHINE\SOFTWARE\Wow6432Node\Apache Software Foundation\Procrun 2.0\WfBUE82AppSrv
Installing the WebFOCUS Business User Edition on a Linux Environment
The following topic describes how to install WebFOCUS Business User Edition (BUE) on a Linux environment. WebFOCUS Business User Edition (BUE) is supported on:
- Intel Linux - Kernel-2.6.32-glibc-2.6 and higher x86_64
64-bit
Note: Java Version 8 Update 102 (8u102) and Tomcat 8.0.36 are included with the WebFOCUS BUE product installation.
- Intel Linux - Kernel-3.10.0-glibc-2.17 and higher x86_64
64-bit
Note: Java Version 8 Update 102 (8u102) and Tomcat 8.0.36 are included with the WebFOCUS BUE product installation.
- Linux on IBM Power Systems - Kernel-3.16.0-libc6-2.19 and higher ppc64le
64-bit (Little Endian)
Note: Java Version 8 Update 101 (8u101) and Tomcat 8.0.36 are included with the WebFOCUS BUE product installation.
WebFOCUS Business User Edition System Requirements on a Linux Environment
|
Topics: |
The following section describes the system requirements for installing WebFOCUS BUE on a Linux environment.
Note: Only one installation per platform is supported.
Installation Prerequisites
The following are installation prerequisites for installing WebFOCUS BUE on Linux:
- WebFOCUS BUE cannot be installed as user
root, due to requirements of the PostgreSQL
database used by Hyperstage. If user root is detected, the installation will exit and the following message displays:
The installation cannot proceed under the root user account and will terminate. Restart the installation as a non-root user.
- When installing WebFOCUS BUE on Linux machines, if the unzip application is not found, the following message displays:
Invalid unzip command found.
This is generated by the installation program and does not prevent the installation from proceeding and completing successfully.
- WebFOCUS BUE requires a minimum of 5GB of available disk space to successfully install on the target system.
- An additional 8GB of required disk space is used during the
installation of the product. This temporary use of disk space will
be removed at the end of the installation.
If the temp directory on the host does not meet the minimum size requirements, the InstallAnywhere environment variable IATEMPDIR can be set to use an alternate directory.
You may specify an alternate /tmp location by setting the following environment variable:
IATEMPDIR=/large_tmp
export IATEMPDIR
System Resource Limits
The operating system provides ways of limiting the amount of resources that can be used. These limits can affect the installation process.
Use the ulimit command to set process memory-related resource limits for your session.
The WebFOCUS BUE installation program requires ulimit to be set to 8192.
Limits can be hard or soft. Hard limits are set by the root user. Only the root user can increase hard limits, although other users can decrease them. Soft limits can be set and changed by other users, but they cannot exceed the hard limits. To view the current limits, enter the following command:
ulimit -a
Use the /etc/security/limits.conf file to store ulimit settings. Changes to this file should be made by a system administrator.
Installing WebFOCUS Business User Edition Using Console Mode
|
How to: |
The following section describes how to install WebFOCUS BUE using Console Mode.
Procedure: How to Installing WebFOCUS Business User Edition Using Console Mode
- Download the self extracting installation program, installWebFOCUSBUE8201.bin.
- Apply the permissions necessary for the owner of the
file to execute the installation by using the following command:
chmod u+x installWebFOCUSBUE8201.bin
- Run the installation program using the following command:
./installWebFOCUSBUE8201.bin -i console
The Welcome to WebFOCUS Business User Edition 82 prompt displays.
- Press Enter to continue.
The License Agreement prompt displays.
- Read the License Agreement. Press Enter after each screen until you receive the License Agreement Acceptance prompt.
- Type Y to accept the terms of the agreement and
press Enter to continue.
The Choose Install Type prompt displays.
- Type 2 to perform a full installation of WebFOCUS BUE.
- Press Enter.
The License Code prompt displays.
- Type the license code (17 digits) for the WebFOCUS BUE Installation.
This code was sent to you as part of the email message that contained the download link for the software.
You are prompted to enter the site code.
- Type the site code (4 digits) for the WebFOCUS BUE Installation.
This code was sent to you as part of the email message that contained the download link for the software.
- Press Enter.
The Setup Preferences prompt displays.
- Accept the default destination folder for the installation.
If you want to install WebFOCUS BUE in a different folder, type
the path to the location where you want to install the software.
Note: Spaces are not allowed in the destination path.
You are prompted to enter the WebFOCUS BUE Administration credentials.
- Type a password to use with the Administration ID, manager.Note:
- The manager Administration ID cannot be changed.
- Passwords must be between 4 and 20 characters and cannot include double quotation marks (") or a dollar sign ($). Leading blanks and trailing blanks will be removed.
The Advanced Configuration prompt displays. Type Y and press Enter if you want to change the default directory location of the WebFOCUS BUE Reporting Server application. Type N and press Enter if you want to use the default directory location of the WebFOCUS BUE Reporting Server.
If you chose to use the default WebFOCUS BUE Reporting Server directory, the Pre-Installation Summary prompt displays.
- Verify that the information in the Pre-Installation Summary
window is correct, and press Enter to continue.
The installation begins.
During installation, the activity window indicates which installation program tasks are being performed.
When installation is complete, a summary is provided displaying the servers that were installed and the ports that have been assigned.
Configuring Java Memory Allocation for the Application Server
For UNIX installations, the default Tomcat Java memory configuration is set to use an initial Java heap size of 256MB and a maximum Java heap size of 512MB.
These settings are in located in the /ibi/WebFOCUS_BUE82/tomcat/bin/catalina.sh file. For example:
JAVA_OPTS="-XX:MaxPermSize=256m -Xms256m -Xmx512m -Djava.awt.headless=true"
For better product performance, it is recommended to increase these values. The initial Java heap size should be at least 1024MB (1GB). The size is normally set in Megabytes. For example:
-Xms1024m
-Xmx2048m
These values need to be set based on the physical memory of the machine.
It is recommended to set the minimum/initial memory value to one eighth (1/8) of the physical memory. The maximum value needs to be one quarter (1/4) of the physical memory.
Launching WebFOCUS Business User Edition
To launch WebFOCUS BUE, type the following:
http://host:port/ibi_apps/
Note: Enter the application server port number when using this command to start WebFOCUS BUE. The application server port number is the lowest port number displayed in the summary at the end of the WebFOCUS BUE installation.
The default port for the WebFOCUS BUE application server is 26000. It is listed during the end of the installation and also available in the installation log file.
Installation log files are under the user home directory. An example of an installation log file is shown in the example below:
/$HOME/WebFOCUS_BUE82_Install_date_time.log
where:
- date_time
-
Is the date and time the log file was created. This log file provides information about the WebFOCUS BUE installation. If you contact Customer Support Services with an installation problem, have this file available.
Running WebFOCUS Business User Edition Servers Manually
The following commands are used to manually start and stop the required WebFOCUS BUE servers.
Note: The double periods (..) before each of the entries below indicates that the full path of the items below should be entered.
Repository Server
-
To start the WebFOCUS BUE Repository Server, run:
nohup ../ibi/WebFOCUS_BUE82/derby/bin/start.sh &
-
To stop the WebFOCUS BUE Repository Server, run:
../ibi/WebFOCUS_BUE82/derby/bin/stop.sh
Reporting Server
-
To start the WebFOCUS BUE Reporting Server, run:
../ibi/WebFOCUS_BUE82/srv/wfs/bin/edastart -start
-
To stop the WebFOCUS BUE Reporting Server, run:
../ibi/WebFOCUS_BUE82/srv/wfs/bin/edastart -stop
Application Server
-
To start the WebFOCUS BUE Application Server, run:
../ibi/WebFOCUS_BUE82/tomcat/bin/startup.sh
-
To stop the WebFOCUS BUE Application Server, run:
../ibi/WebFOCUS_BUE82/tomcat/bin/shutdown.sh
Distribution Server
-
To start the WebFOCUS BUE Distribution Server, navigate to the ../ibi/WebFOCUS_BUE82/WebFOCUS/ReportCaster/bin directory and run:
nohup ./schbkr &
-
To stop the WebFOCUS BUE Distribution Server, navigate to the ../ibi/WebFOCUS_BUE82/WebFOCUS/ReportCaster/bin directory and run:
./stopit
Updating WebFOCUS Business User Edition
|
How to: |
You can update an earlier release of WebFOCUS BUE using the following steps.
Procedure: How to Update WebFOCUS Business User Edition
- Manually stop all WebFOCUS BUE servers, including the Application Server, Repository Server, Distribution Server, Reporting Server, and Hyperstage Server.
- Ensure that all ports that are used by WebFOCUS BUE processes
are stopped. You can run a command, such as netstat, to check
the ports.
Note: If the ports are busy, run a command, such as lsof, to identify what processes are still running, and stop those processes. Before you proceed, you must rerun the netstat command.
- Download the self extracting installation program, installWebFOCUSBUE8201.bin.
- Apply the permissions necessary for the owner of the
file to execute the installation by using the following command:
chmod u+x installWebFOCUSBUE8201.bin
- Press Enter to continue.
The License Agreement prompt displays.
- Run the installation program using the following command:
./installWebFOCUSBUE8201.bin -i console
The Welcome to WebFOCUS Business User Edition prompt displays.
- Read the License Agreement. Press Enter after each screen until you receive the License Agreement Acceptance prompt.
- Type Y to accept the terms of the agreement and
press Enter to continue.
The Choose Install Type prompt displays.
- Type 1 to update an existing WebFOCUS BUE installation to a new Service Pack level.
- Press Enter.
- Verify that the information in the Pre-Installation Summary
window is correct, and press Enter to continue.
The installation begins.
During installation, the activity window indicates which installation program tasks are being performed.
- After the install program ends, change the file permissions
for the Hyperstage Server data folder by issuing the following command:
chmod -R 0700 ../ibi/WebFOCUS_BUE82/srv/wfs/hs/pg_data
- Before launching WebFOCUS BUE, start the WebFOCUS BUE Servers as outlined in Running WebFOCUS Business User Edition Servers Manually.
Uninstalling WebFOCUS Business User Edition
To uninstall WebFOCUS BUE, run the uninstall program using the following command:
../ibi/WebFOCUS_BUE82/Uninstall/Uninstall
Configuring for Email Distribution
|
How to: |
An email server is required for email distribution and notifications. The following procedures provide the steps for configuring the supported mail servers.
Procedure: How to Configure the Mail Server
- From the BUE Portal Menu bar, click Administration, then click Administration Console. Click the ReportCaster tab.
or
From the BUE Portal Menu bar, click Tools, then click ReportCaster Status.
- Click the Configuration option on the ribbon.
- Select the Email Distribution folder.
- Type the name of your mail server in the Mail Server text box.
In addition, if your mail server uses a secure connection or requires authentication, select the appropriate options and type the required credentials. You need to save your configuration changes and restart ReportCaster to make the changes effective.
If you use Google as your email server, see How to Configure Google as Your Email Server.
If you use Yahoo as your email server, see How to Configure Yahoo as Your Email Server.
Procedure: How to Configure Google as the Email Server
- Type the name of the Google SMTP Server
in the Mail Server text box, as shown in the following image.
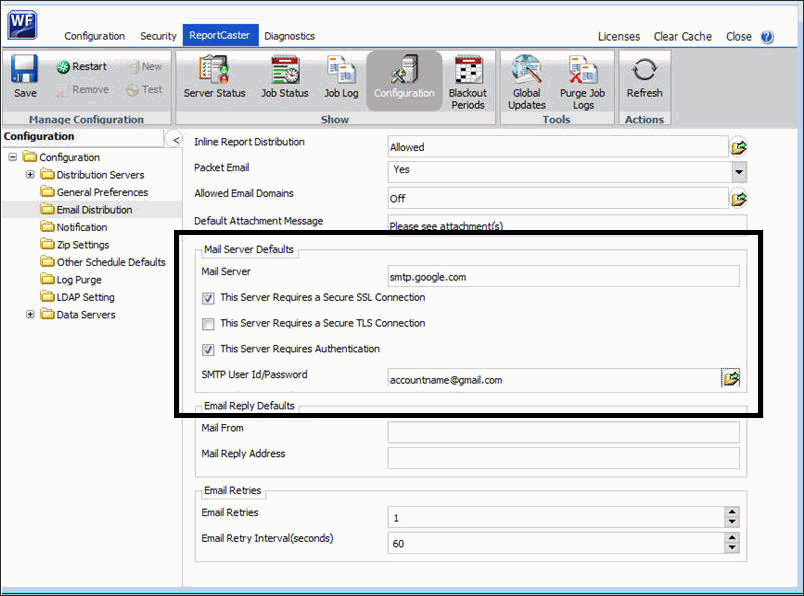
- Select the This Server Requires a Secure SSL Connection check box.
- Do not select the This Server Requires a Secure TLS Connection check box.
- Select the This Server Requires Authentication check box.
- Click the button to open the SMTP User ID/Password dialog box.
- Type your Google account name.
- Type the password for this account.
- Confirm the password for this account.
- Click OK to close the dialog box.
- Click Save in the Manage Configuration group on the ribbon.
- Click Restart in the Manage Configuration group on the ribbon.
Procedure: How to Configure Yahoo as the Email Server
- Type the name of the Yahoo SMTP Server
in the Mail Server text box, as shown in the following image.
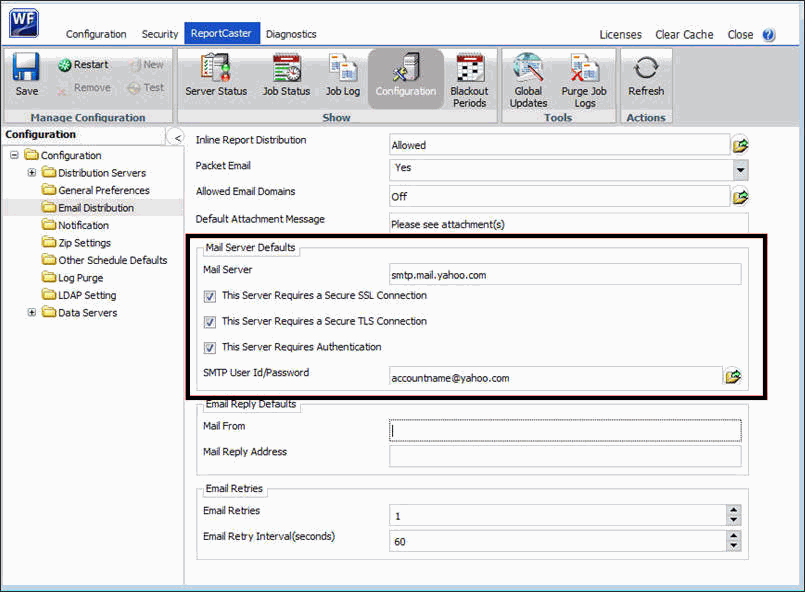
- Select the This Server Requires a Secure SSL Connection check box.
- Select the This Server Requires a Secure TLS Connection check box.
- Select the This Server Requires Authentication check box.
- Click the button to open the SMTP User ID/Password dialog box.
- Type your Yahoo account name.
- Type the password for this account.
- Confirm the password for this account.
- Click OK to close the dialog box.
- Click Save in the Manage Configuration group on the ribbon.
- Click Restart in the Manage Configuration group on the ribbon.
| WebFOCUS | |
|
Feedback |